Re-using Blocks of Content
Overview
Teaching: 0 min
Exercises: 0 minQuestions
How can I reuse the same chunks of material in multiple pages?
Objectives
Create reusable blocks of content and insert them into pages
Learn how to identify and correct errors that lead to Jekyll build failures
In the previous episode, we discussed the benefits of using global and local variables to re-use values throughout our pages. However, repeated use of content in and across websites is usually not limited to individual values such as email addresses and social media handles.
Exercise: What Gets Re-used?
Look at the two pages linked below, and browse some other pages on the same site.
What content is being re-used between pages on these sites? Pair up and compare your partner’s notes with your own. Can you identify any common type(s) of content that is being re-used in these sites?
Solution
The Software Sustainability Institute website re-uses many structural elements, such as the page header (containing the “top menu,” the institute’s logo, links to social media, etc) and footer (containing copyright and licensing information, links to the privacy policy and accessibility statement, a form to subscribe to the institute’s newletter, etc). Elsewhere, blocks of text and images are re-used in the main body of multiple pages, e.g. blog and news posts all end with a description of how the reader can contact the SSI to discuss the content.
The DiverseKids site has the same kind of shared header and footer on each page: this is a common theme across most websites, helping to improve navigation and other aspects of the user experience and achieve consistent “branding” across the whole site. The books listed under each category include a title, a price, and cover image. The category links themselves are also shared across each page, probably generated from the existing categories of books in the collection, and updated automatically when a category is added or removed.
The most commonly reused content is structural: menus and branding information used to present a consistent and recognisable interface to the user regardless of which specific page of the site they’re visiting. We’ll look more at that in the next episode. But some content, such as contact statements and post/product listings, can be reused in the body of pages. The motivation for reusing content like this is that, if you need to update that content - changing the contact address, updating a price or picture associated with a listing, and so on - you need only change this information in one place for the update to be propagated across the whole site. This is related to the DRY (Don’t Repeat Yourself) principle of good practice in programming.
DRY (Don’t Repeat Yourself) Principle
DRY principle is one of the basic principles of software development aimed at reducing repetition of information.
As far as we know, the sites linked in the previous exercise aren’t built with Jekyll. But the principles behind reusing content apply regardless of the particular framework being used to build the site.
Adding and Reusing a Site Banner
Let’s look at an example of how we can create a block of common content and reuse it in multiple pages on our site. At the moment our pages are quite plain: why don’t we try adding a banner to the top of each page?
We’re going to add a pre-made banner image to our repository, and it is good practice to store all image files in a common folder.
- Click “Create new file” under the “Add file” dropdown on your repository homepage,
- In the “Name your file…” box, type
images/. The folder name should be automatically inserted in the path displayed next to this box for naming the file. - You can then leave the file blank and name it
.gitkeep. When you commit the changes, theimagesfolder will have been added to your repository. We will be uploading our banner image to this folder in a moment and unfortunately GitHub does not provide a way to create a new folder while uploading existing files, only while creating new ones. When making these blank files, which exist only to allow the existence of their parent repository, it is traditional to call them.gitkeep. Now download this banner image that we will add to our pages save it with the namesite_banner.pngand upload the file to your newly-createdimagesfolder on GitHub: you can do this by navigating into the folder and choosing “Upload files” from the “Add file” dropdown you used before.
Now that the banner image is available in our site repository,
add this Markdown immediately after the YAML front matter in index.md:


Adding this should result in this title banner appearing at the top of your page.
Image Elements
When adding the image above with Markdown, the filepath in
()tells the web browser the location of the image file to display on the page, and the text in[]defines alternative text (often abbreviated to alt text). This alternative text is important for two reasons:
- It defines the description given to anyone using a screen reader to access your site, who cannot view the image itself. If you do not define alt text for an image/figure, the content of your site becomes less accessible for these users.
- If the browser cannot display the image for some reason (e.g. the image is moved/renamed/cannot be served) the alt text is displayed instead.
It is good practice to always define alt text for your images, and you should aim to limit this alt text to a brief description of the information provided by the image, ideally providing no more or less detail than is displayed in the image itself.
When defining an image (
img) element in HTML (as we will do in the next section), the filepath, or source, of the image is provided as thesrcparameter, and the alt text as thealtparameter.
Exercise: Creating a Linked Banner
It is common for banner logos like the one above to link back to the homepage of the website they are displayed on. With Markdown, turn the image into a link to the landing page (
index.md) of your site.Solution
[](https://YOUR_USERNAME.github.io/YOUR_REPO_NAME/)
To make the banner to appear above every page on our site,
we could add the code above to each Markdown file in our repository.
But if we wanted to adjust it - display a different image,
adjust the link target, etc -
we would need to make the same adjustment on every page.
Instead, we can go some way to avoid this hassle by using
some magic that Jekyll provides: include tags.
To demonstrate this, save the HTML snippet used to display the image into
a new file in your repository, called _includes/banner.md.
Unlike when we wanted to upload a pre-existing file
to a new folder earlier,
we can create the new folder and the new file simultaneously:
- click “Create new file” under the “Add file” dropdown on your repository homepage,
- in the “Name your file…” box, type
_includes/. As before, the folder name should be automatically inserted next to the box. - You can then name the file
banner.mdand, when you commit the changes, the_includesfolder will have been added to your repository.
Now delete the HTML block you added to index.md,
and replace it with the following _includes tag:
{% include banner.md %}
Refresh the page and, barring any typos e.g. in the name of the file,
you should see the banner image on the page as before.
You can add the same include tag at the top of
all the other Markdown files for your site
to get the same banner displayed on every page.
The include tag can be used to insert the Markdown or HTML contained in
any file saved within _includes: provide the path to that file
relative to _includes/ and Jekyll will substitute the contents into the page
before rendering it as HTML.
Like the _config.yml file that contains the configuration for your Jekyll site,
the _includes folder has a name beginning with an underscore to show that it
has a special meaning to Jekyll.
We will see another example of this shortly.
Why Not Use Variables?
We must place our blocks of content for inclusion in separate files because Jekyll does not support substitution of variables within variables. If you’d like to investigate further, you might try creating a global variable in your site’s
_config.ymlwhich includes a call to another variable in its value, e.g.social: "Follow us on [Twitter]({{site.twitter}})", and using it in a page ({{site.social}}for the example above).
Exercise: Including Contact Information
The last line of
index.mdincludes the kind of information you might want to re-use in multiple places throughout your site.## Contact us - Email: [{{ site.email }}](mailto:{{ site.email }}) - Twitter: [{{ site.twitter }}]({{ site.twitter }})Copy the snippet and save it into an appropriately-named file, then use an
includestatement to re-insert it at the bottom of your site’sindex.md, and add it at the bottom of theabout.mdpages.Solution
Create a file called
contact.md(or similar) inside the_includesfolder:## Contact us - Email: [{{ site.email }}](mailto:{{ site.email }}) - Twitter: [{{ site.twitter }}]({{ site.twitter }})and add the line
{% include contact.md %}at the end of
index.mdandabout.md(replacing the equivalent section if it is still present).
Including Link References
You can use
includetags to help minimise the effort required to keep links up-to-date across your site. In the Authoring with Markdown section, we learned about writing reference-style links in Markdown, e.g.[link text][link-target]in the body of the file with a corresponding[link-target]: https://carpentries.orglink reference (usually all such references are kept at the bottom of the file). Usingincludetags, the link references for every page on your site can be stored in a file in the_includesfolder (we recommend the name_includes/links.md) and inserted into the end of each page. With this approach, any time you need to update one of these link references, e.g. if the URL changes to your host institute website, you only need to change the URL in_includes/links.mdto update the target of all the relevant links across your site.
When things go wrong
So far we have seen how to successfully use Jekyll to produce a website. There are however some situations where Jekyll may fail to do so either due to a typo or missing information.
Exercise: Troubleshooting Revisited I
This exercise will help you recognise how common mistakes look like when working with these elements of a Jekyll website.
Edit your
index.mdfile andincludethe (non existing) filemistake.md.Solution
{% include mistake.md %}If you navigate your GitHub repository you will be able to preview the change to
index.mdbut, contrary to what we saw before with invalid Markdown, Jekyll will refuse to build the website and produce an error message.We will see after this where to find the error message and identify what caused them.
If you were keeping an eye on the GitHub repository page until now, you may have noticed a yellow circle visible when the website is still being processed and a green check mark (✓) when successful. You may have also noticed that in the same location there is now a red cross next to the commit message (❌).
This indicates that something went wrong with our Jekyll build process.

You may also find an email from GitHub in your inbox with details about the error. But lets look at our repository again. If we click the red cross next to the commit message (❌) a little pop-up will appear with additional information.
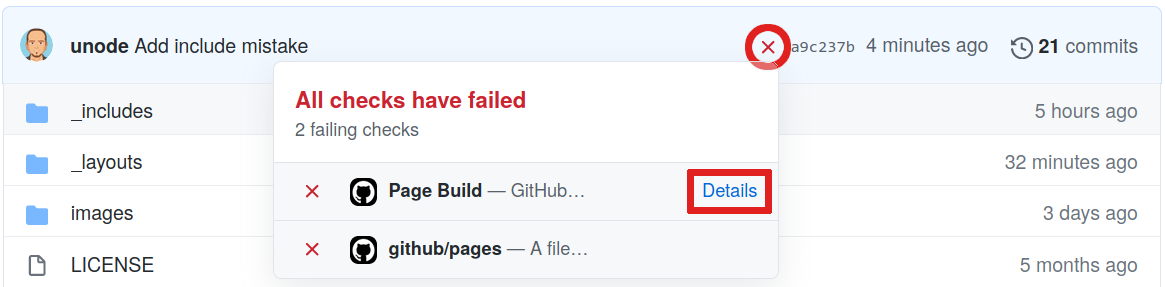
Visiting the page behind the Details link will give us the information we were missing.
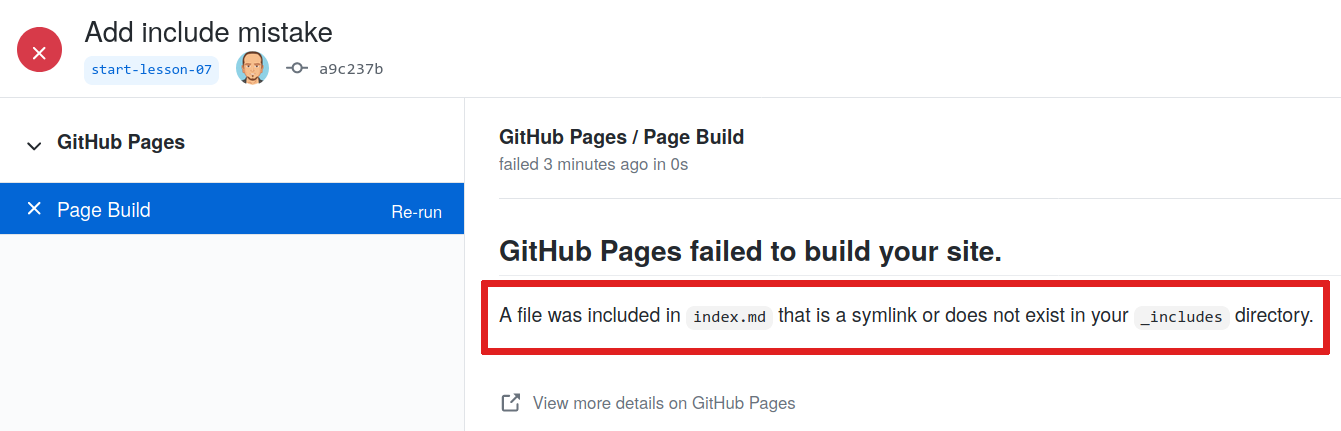
From this page we can see that what caused the failure was the {% include mistake.md %} that we added to index.md.
Since Jekyll cannot find mistake.md the process cannot continue.
Failure will not remove your website
Given the failure you may be wondering what happened to the website? If you visit the address you will find that the website is still be available.
GitHub will keep your previous version online until the error is fixed and a new build is completed successfully.
To fix this error we could create the file _includes/mistake.md
or modify the index.md to no longer include this file,
Lets go ahead and delete {% include mistake.md %} from index.md.
After a few seconds we should see a green checkmark again and our website will be updated.
Key Points
The content of files in the
_includes/directory can be inserted into a page with{ % include file_name % }Errors can happen but Jekyll will often tell us what’s wrong