Content from Curriculum Development in The Carpentries
Last updated on 2022-09-06 | Edit this page
Overview
Questions
- What is The Carpentries?
- How are lessons developed by The Carpentries community?
- What is The Carpentries Workbench?
- Why was the Workbench created?
Objectives
- Describe the process of lesson development and maintenance in The Carpentries.
- Explain the motivation for an accessible, open source lesson infrastructure.
Introduction
Welcome to this workshop at the Research Software Engineers conference 2022.
In this workshop, we will explore how lessons are developed in The Carpentries community.
The schedule is:
| Time | Episode |
|---|---|
| 13:30-14:00 | Introduction |
| 14:00-14:45 | A Collaborative Lesson Design Process |
| 14:45-15:00 | Creating a Lesson Repository |
| 15:00-15:20 | Break |
| 15:20-16:20 | The Carpentries Workbench |
| 16:20-16:40 | Acknowledging Contributions to Lessons |
| 16:40-16:50 | Wrap Up |
The Carpentries

The Carpentries builds global capacity in essential data and computational skills for conducting efficient, open, and reproducible research. We train and foster an active, inclusive, diverse community of learners and instructors that promotes and models the importance of software and data in research. We collaboratively develop openly-available lessons and deliver these lessons using evidence-based teaching practices. We focus on people conducting and supporting research.
All of our lessons are open source, hosted on GitHub, and published under a CC-BY license.
Carpentries Instructors, who are mostly volunteering their time to teach, have taught more than 3600 workshops, in more than 70 countries, across all seven continents.
In addition to these Instructors, there are many other roles that people take on in The Carpentries community. For example, we have:
- Maintainers, who take care of the day-to-day upkeep of our open source lessons;
- Trainers, who teach and certify new Instructors through our Instructor Training program;
- and Curriculum Advisors, who provide high-level guidance on the overall direction of our curricula.
Lesson Development in The Carpentries
Our official lessons are divided across three Lesson Programs: Software Carpentry, Library Carpentry, and Data Carpentry. Each of these programs has a slightly different focus, either in their target audience or in the skills they teach, but all share a common goal of promoting efficiency and reproducibility in research and research-related disciplines.

In addition to The Carpentries official lessons, our community members use our open source infrastructure to create lessons of their own. This community development of new lessons is taking place in The Carpentries Incubator, a space for the community to collaborate on their own lessons with support from other community members and The Carpentries Core Team.

The Carpentries Incubator forms the first part of a pathway for the development of lessons, which can lead to open peer review and publication, and/or adoption by one of The Carpentries lesson programs as a new official lesson.
We are not going to talk much about that pathway for lesson development today, because we are also presenting a poster on exactly that topic at this conference. Come and find us there during the poster session - or any other time during the week - to talk more about our systems and processes for lesson development, review, and publication!
The Carpentries Workbench
TODO
Key Points
- The Carpentries is a global community teaching software and data skills. Their primary audience is researchers and librarians.
- The Carpentries community develops and maintains open source lesson websites, hosted by GitHub Pages.
- The Carpentries Workbench is a completely new infrastructure for building lesson websites.
- The Workbench was created to provide a lesson infrastructure that empowers community members to write and maintain accessible lessons.
Content from A Collaborative Lesson Design Process
Last updated on 2022-09-06 | Edit this page
Overview
Questions
- How do I approach the design for a new lesson?
- What is backwards lesson design?
- How can I get started with lesson development in The Carpentries?
Objectives
- Identify some advantages of an approach to lesson design that focuses on learner outcomes.
- Define a backwards design process for lessons.
- Find existing lesson projects in The Carpentries community.
- Propose a new lesson for development in The Carpentries Incubator.
Lesson Design
Training can come in many forms - from one-on-one mentoring, through semester-long modules, to massive online courses taken by thousands of people on their own schedule.
In The Carpentries, our focus is on short-format training: workshops that usually last ~2 days. It is in this context that our community develops lessons.
All training should be centered on the learners - who are they and what do they want to learn? What do you want to make sure they know how to do by the time they leave your lesson? That perspective can take a bit of getting used to: we must be prepared to forget about the things we most enjoy teaching, and try to focus instead on the things that are most important for learners to understand and be able to do.This is even more true in a short training, where we must always make compromises due to limited time in a workshop.
To help guide us in developing a lesson that will be most effective in teaching learners what we really want them to know, we try to adopt an approach to lesson design that emphasises learner outcomes. When used effectively, this approach to lesson design also helps us to identify what we can cut out if we find that we need to make space or fit the lesson into a shorter timeframe.
Backwards Design
We recommend that lesson developers follow an iterative process to design, develop, and evaluate their lessons. Based on a paradigm described in education theory, called Nicholl’s Five Phases, this approach is often referred to as backwards design.
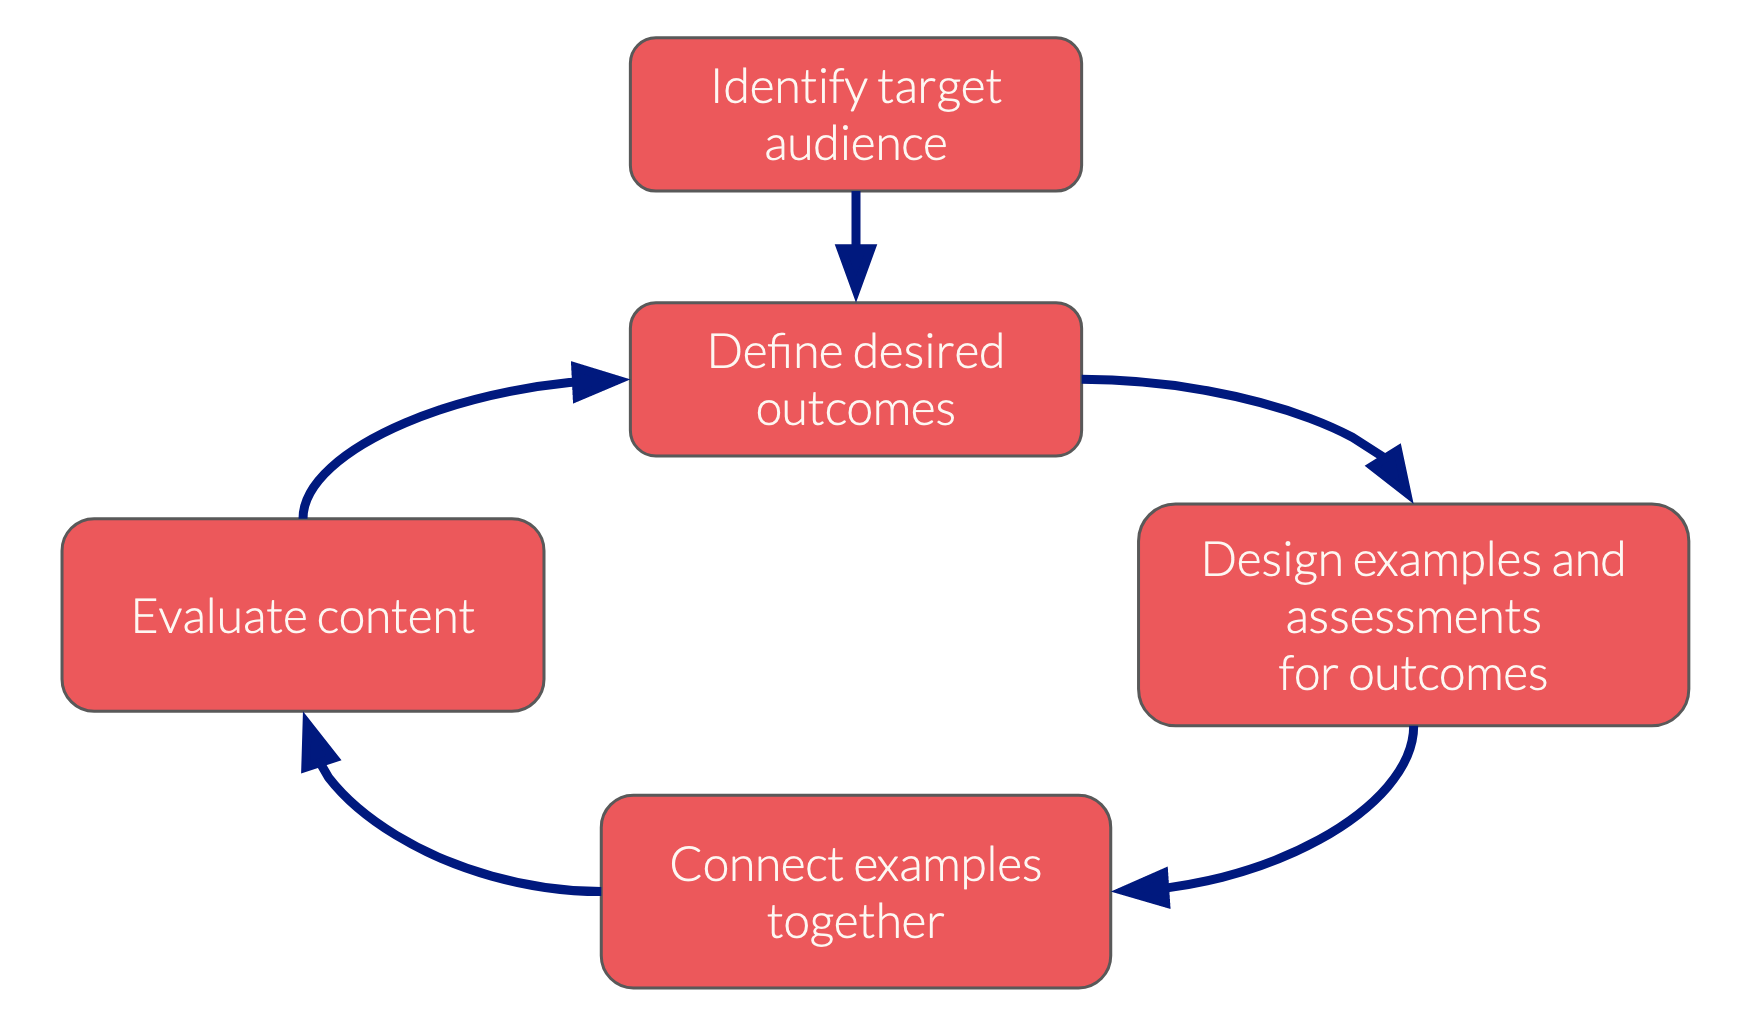
The name backwards design reflects how the process starts by considering what the end of the lesson should look like: what do we want people to have learned, or to be able to do, by the time they leave our lesson?
When we have defined those results - often talked about as learning outcomes, or learning objectives (these terms have slightly different and overlapping definitions, but we should not worry about it here) - we work backwards to develop assessments that will test for those results, and content that will prepare learners for to complete those assessments.
Learning Objectives
The learning objectives or outcomes are the central elements in this: they form the kernel around which a block of lesson content can be constructed, and a well-definied set of learning objectives helps to guide the development of the lesson as a whole. It also makes it much easiert= to design exercises and activities for a lesson that will provide meaningful feedback to the instructor and the learner about how well learners are progressing towards the objectives, i.e. how much they are of what you want them to learn they are actually learning.

A well-defined learning objective should form the end of a sentence that begins “By the end of this lesson, a learner should be able to…”, so the first word in the objective should be an action verb. The “action” here is very important: the objective needs to be specific and measurable, so you want to describe an observable behaviour that learners will exhibit after they finish the lesson.
If you have defined such an observable objective, you can build an assessment to test for it.
Formative Assessment
In a short-format training, we do not usually have the option for a final exam, or summative assessment, to test learners’ understanding and skills after the lesson has finished. This makes it all the more important to include regular formative assessments: opportunities to check learners’ progress towards the learning objectives during the lesson.
Formative assessments come in many forms, but the most common is as exercises. When designed well, exercises provide specific feedback to the learner and instructor, assessing the relevant skill or concept and helping to identify misconceptions so that they can be addressed at the earliest opportunity.
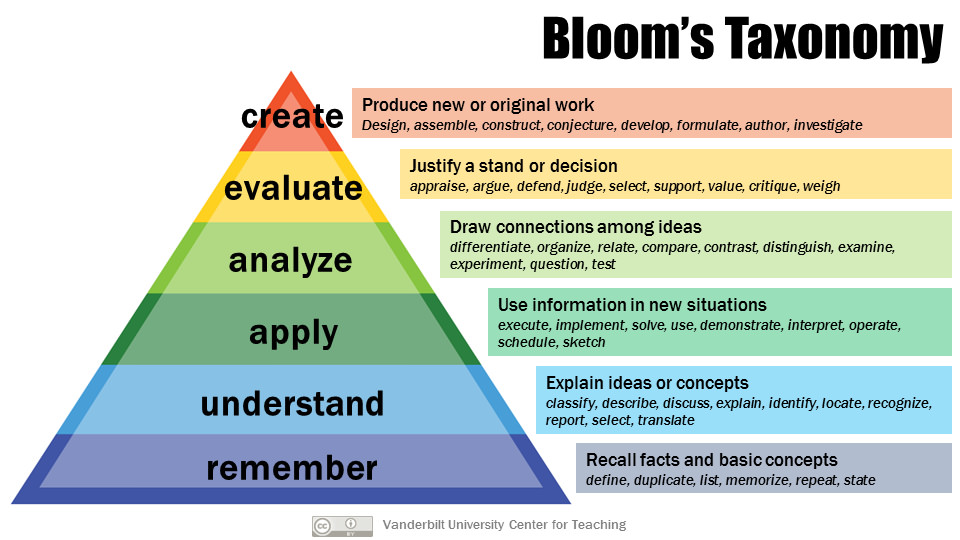
Well-defined learning objectives help us to design better exercises. The action verb at the start of the objective can guide us towards an appropriate exercise format.
For example, a format of exercise that can be very effective when teaching programming topics to novices is “fill in the blanks”, where a block of code is presented with essential parts removed. The intended output of the program is shown or described, and the learner is tasked with completing the blanked out parts of the code block to achieve this result. For example:
Example Exercise: Fill in the Blanks
The code block below is intended to define a function, shout, which accepts a single string argument and returns a converted version of that string in all upper case with an exclamation point at the end. For example, shout("meet me at the reservoir") should return "MEET ME AT THE RESERVOIR!" and shout("Mary, there is no hope for us") should return "MARY, THERE IS NO HOPE FOR US!".
Fill in the blanks in the code block to complete the function definition.
PYTHON
______:
    output_string = input_string.upper() + '!'
______PYTHON
def shout(input_string):
    output_string = input_string.upper() + '!'
    return output_string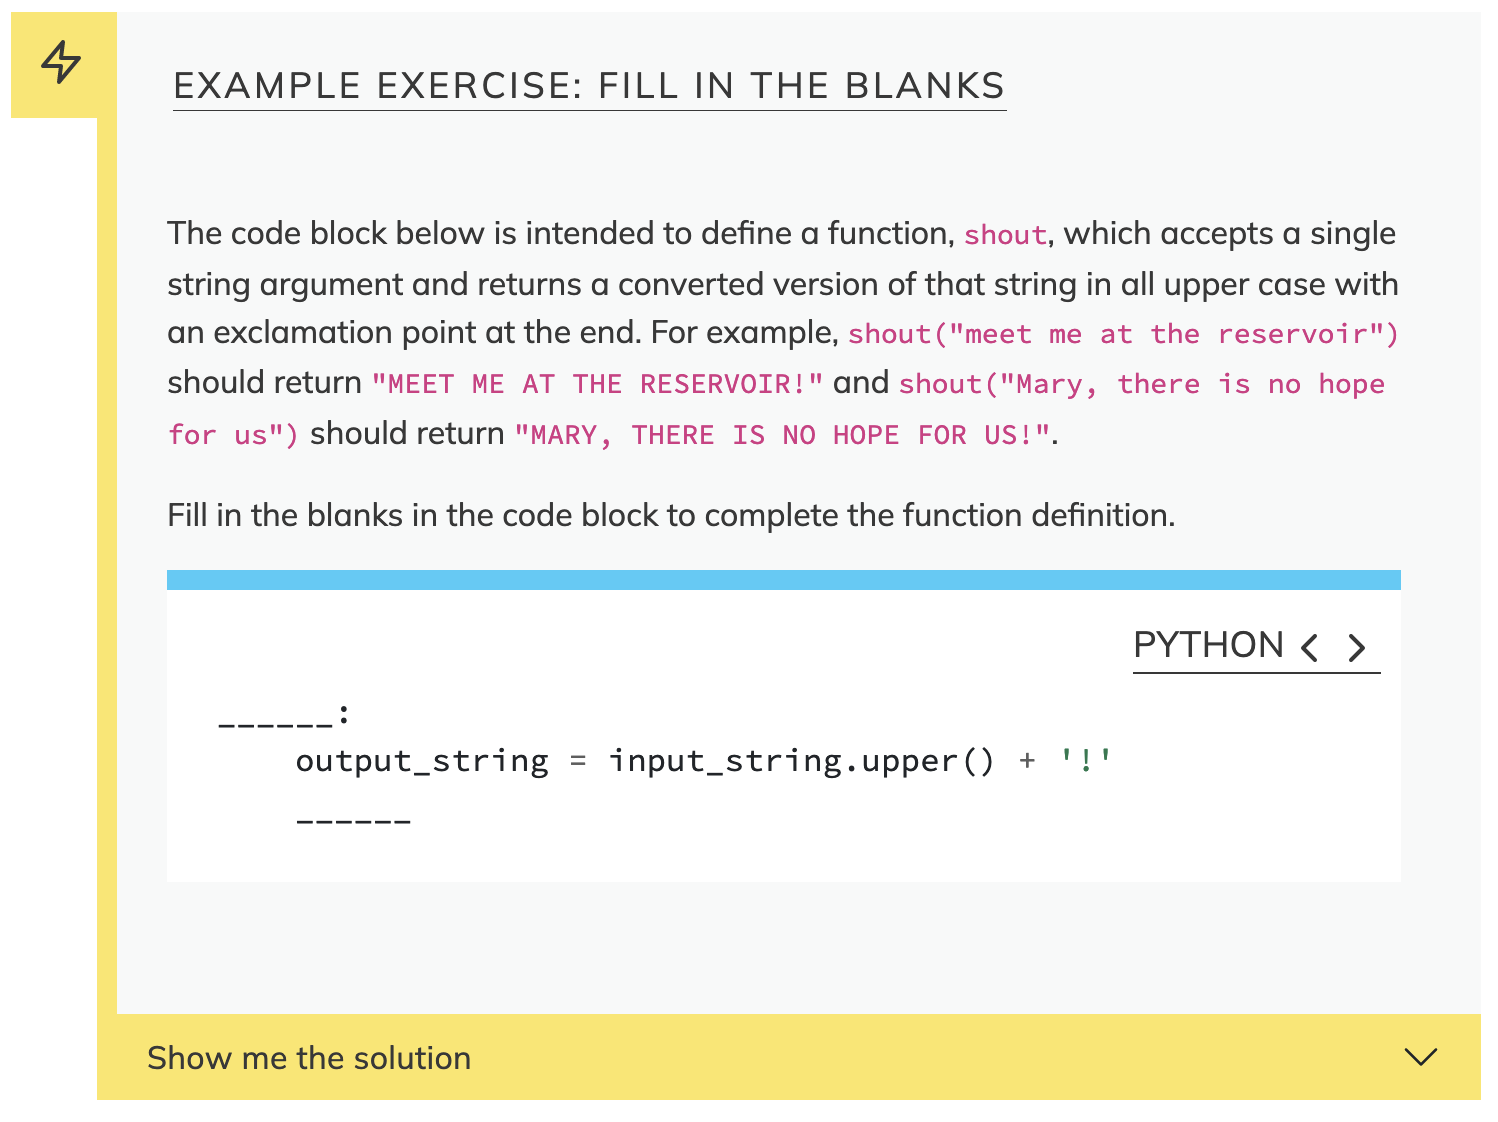
This format of exercise is best-suited to novices because it provides a lot of scaffolding: most of the code and syntax is already in place, and blanks should have been inserted carefully, to assess the specific skill or concept that has just been taught. This allows the learner to focus on this particular concept or skill, and requires them to demonstrate their understanding when solving the problem.
A fill-in-the-blanks exercise is best suited to assessing objectives with action verbs like “identify”, “use”, or “define”, when linked closely to some specific syntactic element or concept, e.g. “define a loop to import data from an arbitrary number of input files.”
More Exercise Formats
Here are three more exercise formats. Can you suggest some action verbs these formats would be good for assessing?
1. Parsons Problem
This type of exercise provides all the right lines of code, but in the wrong order and with indentation removed.
2. Theme & Variations
This type of exercise provides some example code and instructs the learner to adapt that to a new purpose.
3. Minimal Fix
This type of exercise presents some broken code and the desired result, and asks the learner to make the smallest possible change to fix the program.
Example Exercise: Parsons Problem
The lines of code below are intended to normalise the holdout set or, if the user has chosen to skip normalisation, to check whether the holdout set has already been normalised and exit the program if not.
However, the order of these lines has been scrambled. Reorganise the lines to make the program run correctly. You may wish to add some indentation to help make the code more readable.
R
if (normalize) {
if (verbose > 1) {
feat.test <- get.norm_feat.matrix(siamcat.external)
message("+ Performing frozen normalization on holdout set")
siamcat.external <- normalize.features(siamcat.external, norm.param = norm_params(siamcat.trained),feature.type='original', verbose = verbose)
warning("WARNING: holdout set is not being normalized!")
if (is.null(norm_feat(siamcat.external, verbose=0))){
stop('Holdout set has not been normalized yet!')
} else {
}
}
}
R
if (normalize) {
    if (verbose > 1) {
        message("+ Performing frozen normalization on holdout set")
    }
    siamcat.external <- normalize.features(
        siamcat.external, norm.param = norm_params(siamcat.trained),
        feature.type='original', verbose = verbose)
} else {
    warning("WARNING: holdout set is not being normalized!")
    if (is.null(norm_feat(siamcat.external, verbose=0))){
        stop('Holdout set has not been normalized yet!')
    }
}

Example Exercise: Theme & Variations
This program selects the pixels in a rectangular area at the top-left of the input image, and sets the intensity of those pixels to zero.
Adjust the program so that it instead selects an area at the bottom-right of the image.
PYTHON
def top_left_to_zero(image, rows, columns):
image[0:rows, 0:columns] = 0PYTHON
def bottom_right_to_zero(image, rows, columns):
    image[image.shape[0]-rows:image.shape[0], image.shape[1]-columns:image.shape[1]] = 0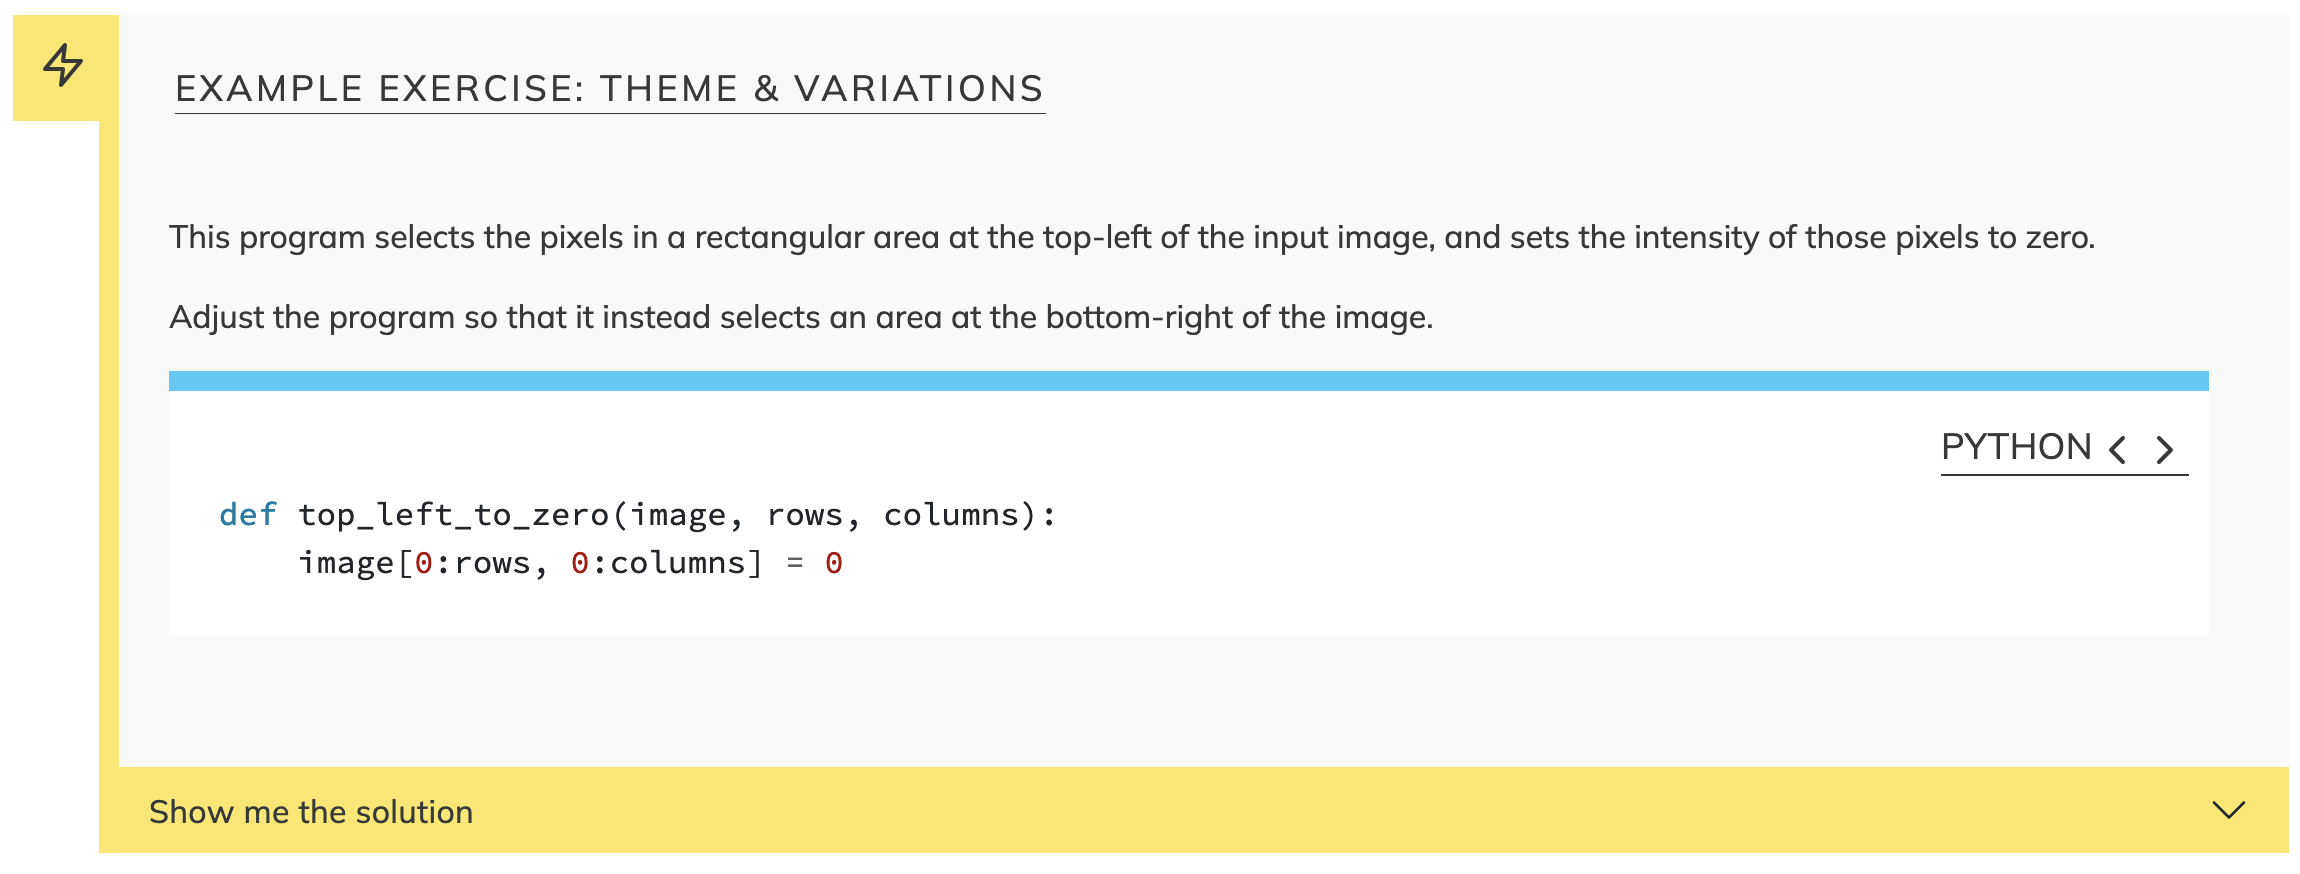
Example Exercise: Minimal Fix
This function is supposed to test whether a number lies within a range. Make one small change so that it actually does so.
PYTHON
def inside(point, lower, higher):
    if (point <= lower):
        return False
    elif (point <= higher):
        return False
    else:
        return True
(This example taken from Greg Wilson’s Teaching Tech Together.)
PYTHON
def inside(point, lower, higher):
    if (point <= lower):
        return False
    elif (point >= higher):
        return False
    else:
        return True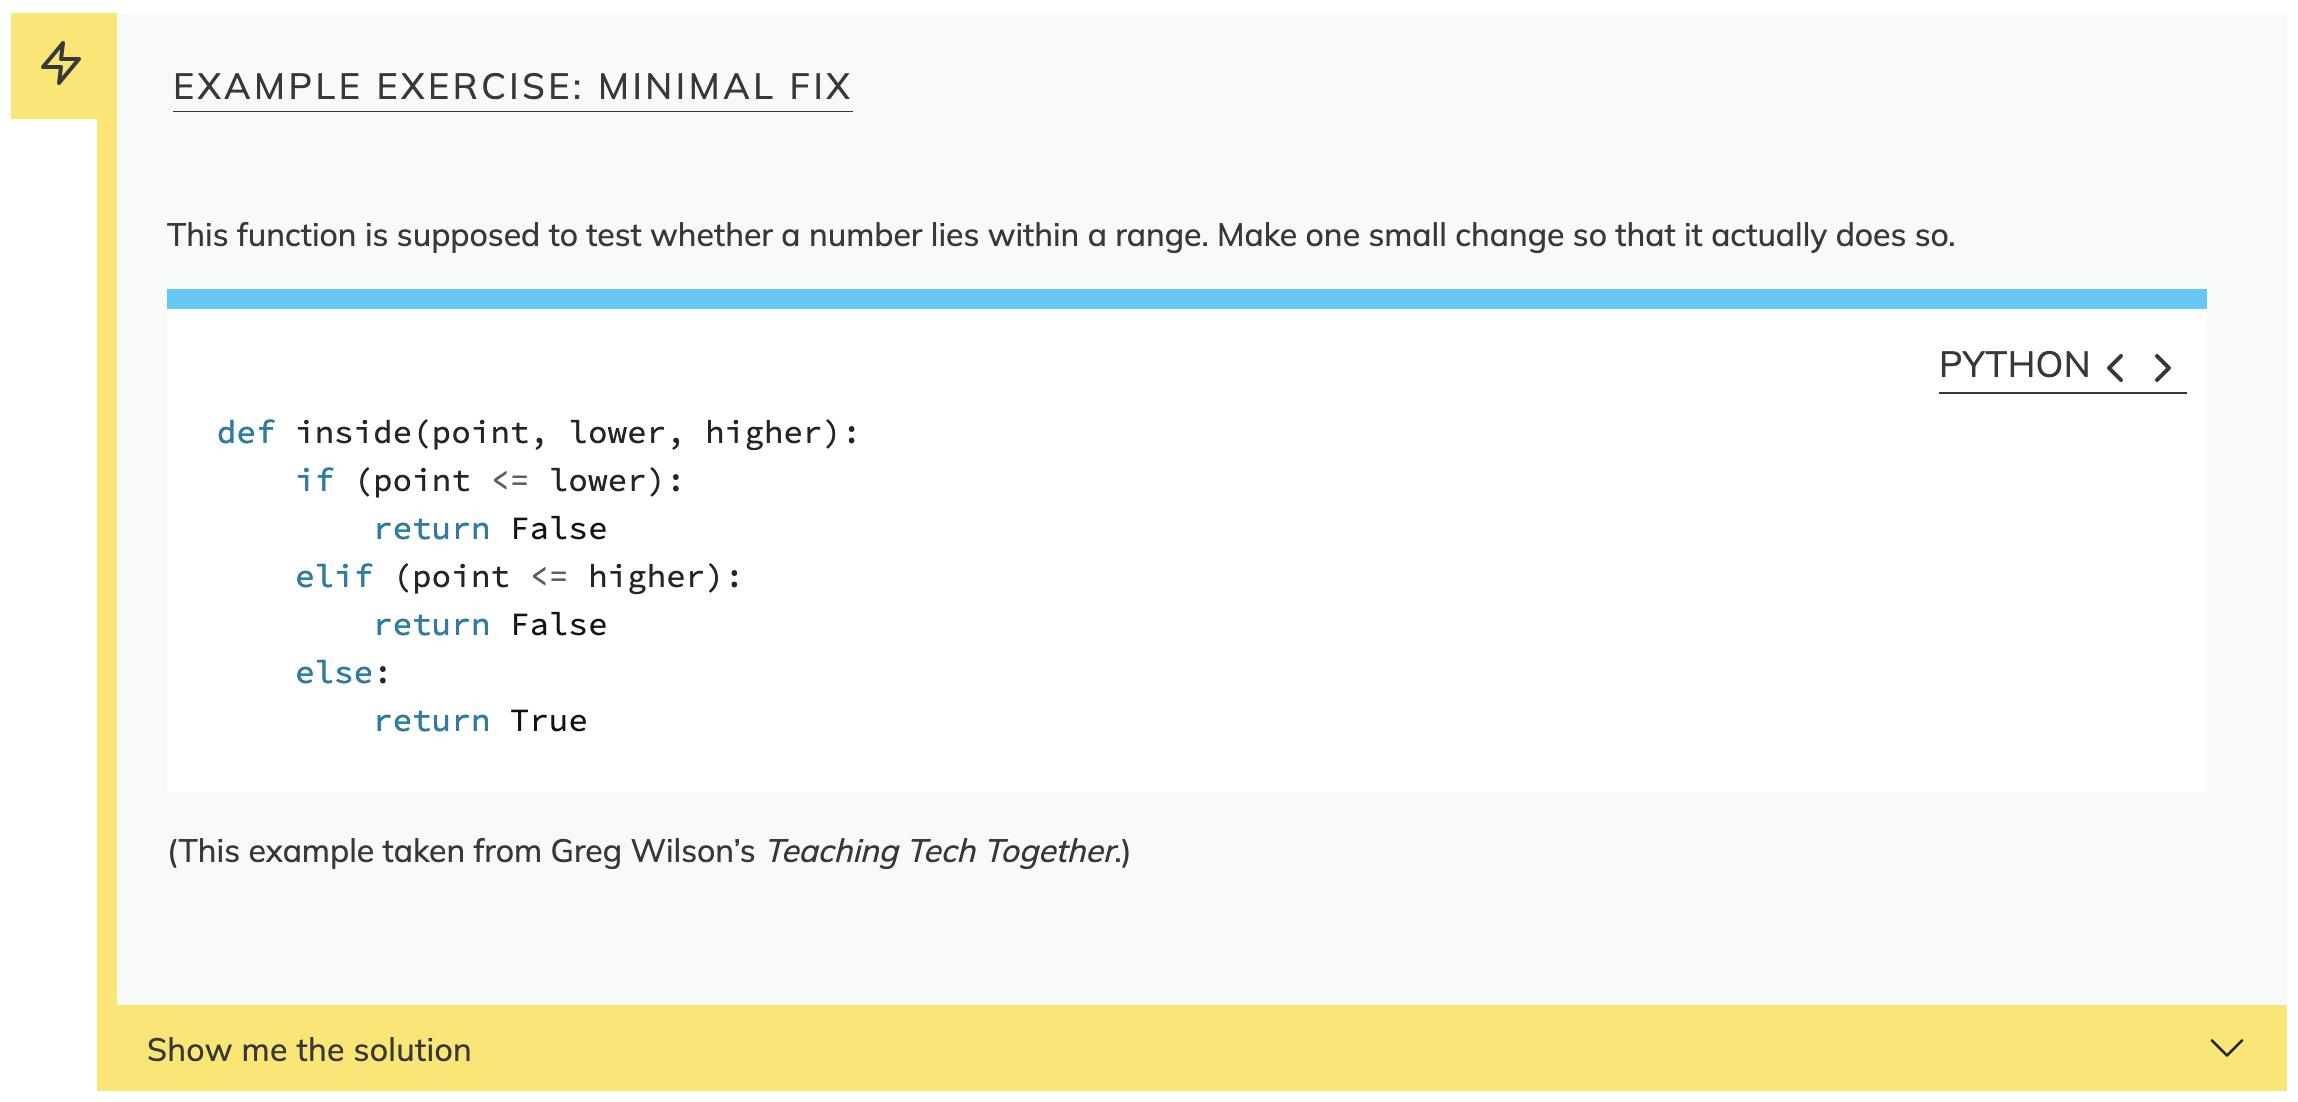
For more ideas about exercise formats, read the Exercise Types chapter of Teaching Tech Together by Greg Wilson.
Collaborative Lesson Development Training

We have begun teaching all of this in a lot more detail in a new program of Collaborative Lesson Development Training. If you are planning to begin developing a new lesson, and especially if you are interested in doing so using the open source infrastructure we are presenting in this workshop, I recommend you look out for this training.
The Carpentries Incubator

In The Carpentries Incubator, we provide support for collaborative lesson development, including:
- Collaborative Lesson Development Training
- Templates for lesson repositories, feedback surveys and notes from pilot workshops, and communications
- Help with communication about a lesson project & networking to build a community of contributors around a lesson
- Building a community of practice around lesson development - collaborate with others and re-use lessons
- Infrastructure (the rest of this workshop)
If you would like to find out about the lessons that are already under development in the Incubator, visit our Community Lessons listing. To propose a new lesson for the Incubator, head to our Proposals repository, open a new issue, and answer the questions in the issue template.
To find out more about the Incubator and the pathway that a new lesson can take through it and out the other side, find our poster at the conference.
How can RSEs Help?
Research Software Engineers are more aware than most people about the skills that researchers and RSEs need, and upcoming developments that they should prepare for. This makes you well-placed to identify topics for lessons that could be developed. Indeed, RSEs often have teaching responsibilities, or choose to teach as an effective means of increasing capacity and the quality of research at their institutes.
RSEs can help The Carpentries with our mission by contributing to existing lessons and developing new ones that teach the skills you know people need to learn. As well as writing new lessons, you can provide valuable feedback to lesson developers by teaching their lessons and sharing your experience, and even by volunteering to peer review lessons in The Carpentries Lab - again, come see our poster for more information on that!
Key Points
- When designing a new lesson, we recommend starting by identifying your target audience, thinking about what they already know, and what you want them to be able to do by the end of the lesson.
- Backwards lesson design is an iterative process for lesson design and development that focuses on the desirable, observable behaviours the lesson should teach to learners.
- Lessons are being developed in The Carpentries Incubator. You can go there to find an existing lesson to contribute to, or to propose a new lesson of your own.
Content from The Carpentries Workbench
Last updated on 2022-09-05 | Edit this page
Overview
Questions
- How is a lesson site set up and published with GitHub?
- What are the essential configuration steps for a new lesson?
- How do you create and modify the pages in a lesson?
- How do you preview changes made to a lesson?
Objectives
- Identify the key tools used in The Carpentries lesson infrastructure.
- Complete the fundamental setup steps for a new lesson repository.
- Find the most important source files for a lesson website.
- Edit the RMarkdown source of an episode using RStudio.
- Build and view a local version of a lesson website.
- Preview the changes to a rendered lesson in a Pull Request.
Check your setup!
Before you work with this episode, make sure you have installed:
- R
- RStudio
- Git
And please make sure you have a GitHub account you can connect to.
- create repo on GitHub from Rmd template
- tour that, then clone locally
- create_episode
- preview
- push
- open pull request
In this next part of the workshop, we will explore the new infrastructure for lessons - The Carpentries Workbench. In this section, you will learn about the key components of the Workbench and gain some hands-on experience of creating and editing a lesson website using the Workbench.
GitHub Pages
From the beginning, Carpentries lessons have been freely available for all to use under a CC-BY license.
The source of all The Carpentries lessons is made publicly-available in repositories on GitHub. By making our repositories public like this, we encourage others to help us maintain and improve our lessons, and make it as easy as possible for them to re-use and modify our lessons for their own purposes.
Via a system called GitHub Pages, users can build and host websites from the files present in any repository on GitHub. For many years, this has been how The Carpentries presents its lesson websites to the world.
Using The Carpentries Workbench
Starting in 2023, Carpentries lesson websites will be built with The Carpentries Workbench, a toolkit that converts Markdown and RMarkdown files into the HTML that can be served by GitHub Pages.
Creating a Lesson Repository
To get started, we first need to create a new repository for our lesson. We will use a template to do this, so that the new repository contains the basic files and folders that the Workbench needs in order to build a lesson site. There are currently two templates to choose between:
-
A Markdown template, suited for lessons that do not need to contain executable code.
- An RMarkdown template, best suited to lessons that will include R source code that will generate output.
We are going to use the RMarkdown template in this workshop.
Creating a new lesson repository
Follow the steps demonstrated by the workshop lead:
- generate a new repository from the Rmd lesson repository template
- complete the configuration for that new repository:
- Add a name for the repository
- The name should be descriptive but fairly brief, with hyphens (
-) to separate words - The name can always be changed later, via the repository settings
- The name should be descriptive but fairly brief, with hyphens (
- In the “Description” field, write the title of your lesson
- Choose “Public” visibility
- Make sure the “Include all branches” box is checked. This is not required, but means that the setup on GitHub pages moves faster initially.
- Add a name for the repository
After pressing the Create repository using this template button, you should be presented with a brand new lesson repository.
Main Files and Folders
The repository contains a number of files and folders. The most important files and folders are:
-
episodes/contains the main narrative content of the lesson -
instructors/contains information useful for instructors such as instructor notes relevant for the overall lesson or extra exercises that could be useful for learners who would like an extra challenge -
learners/contains information that would be useful for learners such as a reference document and setup instructions. -
profiles/contain learner profiles for people who might find this lesson useful. This will help learners assess if the workshop is for them and help the instructors know what they can expect from their audience.
Note that The Workbench recognises both Markdown and RMarkdown filetypes.
… and the rest!
Most of these are source files for the content of our new lesson, but a few are accompanying files primarily intended for the repository itself rather than the lesson website. These are:
CODE_OF_CONDUCT.mdCONTRIBUTING.mdLICENSE.mdREADME.md.gitignore- and the
.github/folder.
We will address all of the files later in the workshop. For now, we will move on to complete the basic setup of the lesson.
Configuring a Lesson Repository
Activating GitHub Pages
We need to tell GitHub to begin serving the lesson website via GitHub Pages. To do this, navigate to Settings, then choose Pages from the left sidebar. Under Source, choose the gh-pages branch, leave the folder set to / (root), and click Save. Now, copy the URL in the box: this will be the address of your lesson site.
Which branch to use?
Although we configure GitHub Pages to serve the lesson website from the gh-pages branch, the default working branch for a lesson will be main. For the rest of this training, you should add and edit files on main, and in future, when you open Pull Requests to update the lesson content, these should also be made to main. The gh-pages branch should never be modified by anyone other than the automated actions-user account.
Returning to the repository home page (e.g. by clicking the name of the project near the top left of the window), click the gear wheel icon near the top right, to edit the About box. Paste the Pages URL into the Website box and click Save changes.
After following these steps, when you navigate to the pages URL, you should be see a lesson website with The Carpentries logo and “Lesson Title” in the top-left corner. You may need to wait a minute or two for the GitHub to render the website.
Setting global parameters in config.yaml
The lesson title can be adjusted by modifying the config.yaml file in the repository. The config.yaml file contains several global parameters for a lesson—to determine some of the page styling, contact details for the lesson, etc—and is written in YAML, a structured file format of key-pair values. As well as the title of the lesson, you can and should adjust some of the other values in config.yaml, but you should not need to add new values or learn a lot about YAML to be able to configure your lesson.
Practice with config.yaml (5 minutes)
Complete the configuration of your lesson by adjusting the following fields in config.yaml:
-
email: add an email address people can contact with questions about the lesson/project. -
created: the date the lesson was created (today’s date) in YYYY-MM-DD format. -
keywords: a (short) list of keywords for the lesson, which can help people find your lesson when searching for resources online. -
source: change this to the URL for your lesson repository.
We will revisit the life_cycle and carpentry fields in config.yaml later in this training.
Improving the README.md
The README.md file is the “front page” of your lesson repository on GitHub, and is written in Markdown. You should use it to provide basic information about the project, for anyone who finds their way to the source files for your lesson. Although we do not have time in this workshop, if you intend to keep working on your lesson when you leave, we recommend that you take a few minutes to update the README with some basic information about the project, e.g.:
- the lesson title
- a short description of the lesson
- a list of the names of the authors, optionally linked to their GitHub profile
Working with a Local Copy
Before we explore the source files for the content of a lesson, we will make a copy of the new lesson repository on our local system. To do so, we need to clone the repository to a place on our system where we can find it easily.
In the example below, we clone the repository to our user’s Desktop on our filesystem, using the SSH protocol. (If you configured a personal access token for authenticating to GitHub, instead of SSH keys, you should use the HTTPS protocol.)
BASH
cd ~/Desktop
git clone git@github.com:USER_NAME/REPOSITORY.git
Now that we have a copy of the lesson repository locally, we need to make sure that we have everything we need to continue working with that repository on our own system.
Installing the Workbench
- Open RStudio
- In the console, type the following commands to install the workbench and all the required packages:
R
# register the repositories for The Carpentries and CRAN
options(repos = c(
  carpentries = "https://carpentries.r-universe.dev/",
  getOption("repos")
))

# Install the template packages to your R library
install.packages(c("sandpaper", "varnish", "pegboard", "tinkr"))
For Linux Users
If you have a linux system, you may need to install C libraries that the workbench dependencies require (such as libxml). A set of dependencies for ubuntu can be found using the following command:
BASH
curl https://carpentries.r-universe.dev/stats/sysdeps 2> /dev/null \
| jq -r '.library | select(. != null)'
OUTPUT
c++
curl
fontconfig
freetype
fribidi
harfbuzz
icu
libgit2
libjpeg-turbo
libpng
libtiff
libxml2
libxslt
openssl- Test your installation: copy and paste this code and see if you get similar output.
R
library('sandpaper')
library('fs')
library('rmarkdown')
rmarkdown::pandoc_version()
#> [1] '2.18'
tmp <- tempfile()
sandpaper::no_package_cache()
#> ℹ Consent for package cache revoked. Use `use_package_cache()` to undo.
sandpaper::create_lesson(tmp, open = FALSE)
#> → Creating Lesson in '/tmp/RtmpOBHY8v/file541125775e3a'...
#> ℹ No schedule set, using Rmd files in 'episodes/' directory.
#> → Creating Lesson in '/tmp/RtmpOBHY8v/file541125775e3a'...→ To remove this message, define your schedule in 'config.yaml' or use `set_episodes()` to generate it.
#> → Creating Lesson in '/tmp/RtmpOBHY8v/file541125775e3a'...✔ First episode created in '/tmp/RtmpOBHY8v/file541125775e3a/episodes/01-introduction.Rmd'
#> → Creating Lesson in '/tmp/RtmpOBHY8v/file541125775e3a'...ℹ Workflows up-to-date!
#> → Creating Lesson in '/tmp/RtmpOBHY8v/file541125775e3a'...✔ Lesson successfully created in '/tmp/RtmpOBHY8v/file541125775e3a'
#> → Creating Lesson in '/tmp/RtmpOBHY8v/file541125775e3a'...
#> /tmp/RtmpOBHY8v/file541125775e3a
sandpaper::build_lesson(tmp, preview = FALSE, quiet = TRUE)
fs::dir_tree(tmp, recurse = 1)
#> /tmp/RtmpOBHY8v/file541125775e3a
#> ├── CODE_OF_CONDUCT.md
#> ├── CONTRIBUTING.md
#> ├── LICENSE.md
#> ├── README.md
#> ├── config.yaml
#> ├── episodes
#> │   ├── data
#> │   ├── fig
#> │   ├── files
#> │   └── 01-introduction.Rmd
#> ├── index.md
#> ├── instructors
#> │   └── instructor-notes.md
#> ├── learners
#> │   └── setup.md
#> ├── links.md
#> ├── profiles
#> │   └── learner-profiles.md
#> └── site
#>     ├── DESCRIPTION
#>     ├── README.md
#>     ├── _pkgdown.yaml
#>     ├── built
#>     └── docs
If everything looks ok (e.g. no warnings or errors), we can go ahead and open the lesson repository as a project in RStudio (File -> Open Project…).
Having Trouble?
If you are having trouble installing a particular component of the workbench, we have created an RStudio cloud instance that you can use to follow along with the desktop commands: https://rstudio.cloud/content/4442910.
Previewing the Lesson
To see how the lesson website looks with this new episode added, we can build and serve a local version of the site, which will be automatically updated whenever we make changes to the source files.
R
sandpaper::serve()
After a short wait, a preview of the built lesson site should pop into the Viewer panel of RStudio. (You can “pop” it out into a web browser tab by clicking the little Show in new window button near the top of the Viewer panel.)
Lesson Content Source Files
Using the Files tab within RStudio, we can begin to look at where the content of a lesson is stored and written.
The “home page” of a lesson is created from the index.md file: this file should contain a brief introduction to the lesson, designed to give visitors to the page a first impression of the lesson and whether it is appropriate for them.
The main body of the lesson is written in episodes: the individual chunks or sections that the lesson is separated into. The episode pages of the lesson site will be constructed from Markdown files in the episodes folder of the lesson repository.
The episodes folder of the new repository contains a single file, 01-introduction.Rmd. The content of this file includes examples of how to write RMarkdown files for The Carpentries Workbench.
There are two important things to note:
- The file begins with a short header, written in the same key-value pair syntax we encountered in
config.yaml. The fields in this header describe the episode title and the estimated time (in minutes) required to teach it and complete the exercises. - The example content begins after the blank line that follows this header. It includes several lines that start with strings of colons (
:::::::). These mark the beginnings and ends of structural elements within the page, called fenced divs. Each fenced div starts and ends with a string of colons. A word at the end of the starting colons indicates what kind of block it is. Fenced divs are used for a variety of different blocks of content, including:- challenges and solutions
- instructor notes
- callouts i.e. optional content that can provide extra context or answer a frequently asked question about a particular topic in a lesson
MARKDOWN
---
title: "Using RMarkdown"
teaching: 10
exercises: 2
---

:::::::::::::::::::::::::::::::::::::: questions

- How do you write a lesson using RMarkdown and `{sandpaper}`?

::::::::::::::::::::::::::::::::::::::::::::::::

::::::::::::::::::::::::::::::::::::: objectives

- Explain how to use RMarkdown with The Carpentries Workbench
- Demonstrate how to include pieces of code, figures, and nested challenge blocks

::::::::::::::::::::::::::::::::::::::::::::::::
Creating a New Episode
To add a new episode to a lesson, we can run the sandpaper::create_episode_rmd() function:
R
sandpaper::create_episode_rmd("Next Episode")
When you call this function, you should see a new file called 02-next-episode.Rmd appear in the episodes folder. It will have the same example content as 01-introduction.Rmd but with a different title in the YAML header, based on the name you specified for the new episode in the call to create_episode.
Pushing to GitHub
Push new episode back to github using either the Git tab in the top left pane or
Editing an Episode
We will use the code block and output below to demonstrate one of the new features provided by The Carpentries Workbench: automated feedback about changes to the rendered lesson content that would be made by a pull request.
MARKDOWN
```{r pyramid, fig.alt = "pie chart illusion of a pyramid", fig.cap = "Sun arise each and every morning"}
pie(
  c(Sky = 78, "Sunny side of pyramid" = 17, "Shady side of pyramid" = 5),
  init.angle = 315,
  col = c("deepskyblue", "yellow", "yellow3"),
  border = FALSE
)
```
Change the colour of the pyramid
Following along with the workshop leads, and working in RStudio on the local copy of your repository, follow these steps:
- Create a new branch in Git, and switch to it
- Find the code block above in the new episode file that you created earlier.
- Change the colours of the pyramid parts of the figure above (defined in the
colparameter ofpie). Here is a resource for the available colour names in R - Commit the change
- Push the branch to your remote repository on GitHub
- Open a pull request to merge that branch into the
mainbranch of your repository - Look at the preview of the changes to rendered content. This should appear as a comment in the pull request discussion tab shortly after the PR has been opened.
MARKDOWN
```{r pyramid-green, fig.alt = "pie chart illusion of a pyramid", fig.cap = "Sun arise each and every morning"}
pie(
  c(Sky = 78, "Sunny side of pyramid" = 17, "Shady side of pyramid" = 5),
  init.angle = 315,
  col = c("deepskyblue", "palegreen", "limegreen"),
  border = FALSE
)
```
Key Points
- Lesson sites are built from source repositories with GitHub Pages.
- A new lesson repository can be created from a template maintained by The Carpentries, and configured by adjusting the
config.yamlfile. - The main pages of a lesson website are created from Markdown or RMarkdown files in the
episodesfolder. - A local version of a lesson can be built and viewed with
sandpaper::serve().
Content from Crediting Contributions to Lessons
Last updated on 2022-09-07 | Edit this page
Overview
Questions
- In what ways can people contribute to a lesson?
- How should we acknowledge contributions to lessons?
Objectives
- Discuss how The Carpentries and lesson authors should give credit to contributors.
Valuing All Contributions
- The Carpentries community is very diverse - many people who take on many different roles
- One of our core values is that we Value All Contributions
- Lesson development process provides opportunity for people to write lessons, provide feedback on them, maintain them, contribute fixes and enhancements to them, and more
- It can be difficult to capture all of this, e.g. GitHub only pays attention to commits in the list of contributors. Misses people who open or contribute to issues
- We want to better capture all of the contributions that make a lesson exist, and make that information more visible.
- With that in mind, would like to gather feedback from you all about a new page we want to introduce to lessons that use the Workbench: a Lesson Credit page.
What kinds of contribution can there be?
- take a few minutes to think about the process for a stable lesson to exist, from start to finish
- who makes that happen? and when? what types of contribution are made?
- write these types of contribution on sticky notes, and stick them to the [wall/white board], roughly where they might fall in the life cycle of the lesson.
- show current prototype for lesson credit page
Give us your feedback
Using more sticky notes, give us feedback/your ideas on the following, according to sticky note colour:
- pink: what is missing from this page?
- yellow: who could be the target audiences for this page?
- green: anything else you would like to tell us
Stick your notes to the wall on your way out of the room.
Key Points
- The Carpentries values all contributions.
- It can be challenging to appropriately credit all contributions made to a lesson.